Advanced Python for DevOps

About seeking a fresher job opportunity in DevOps and CloudOps | AWS | GitHub | LInux | GitHub Actions | Docker | Volunteering @ AWS User Group Kolkata | MCA Graduated 2024
Learning points:
🔹 Object-Oriented Programming (OOP) – Classes, Inheritance, and Polymorphism.
🔹 Concurrency & Parallelism – Using threading and multiprocessing.
🔹 Creating & Interacting with APIs – Buiding REST API FastAPI.
🔹 Database Integration – Working with MySQL/PostgreSQL using SQLAlchemy.
🔹 Logging & Debugging – Setting up structured logging (logging module).
🔹 Infrastructure Automation – Using Python for provisioning servers, managing SSH connections (paramiko).
🔹 Building Python Apps – Flask/Django for web apps
🔹 Packaging & Distribution – Creating Python packages with setuptools.
Initial Tasks:
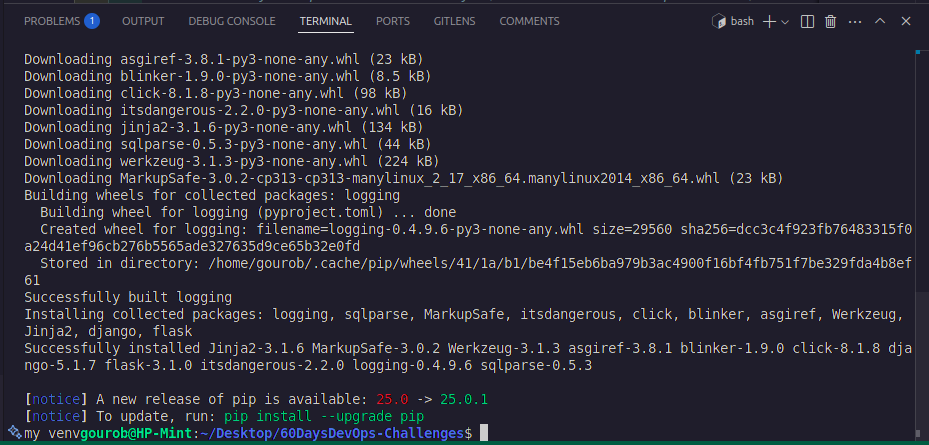
✅ Task 1: Set up a virtual environment (venv) and install the required packages (pip install flask django requests logging).
✅ Output:
🔥 Challenges
🔹 Challenge 1: Create a Python script that connects to a remote server via SSH using paramiko.
🔹 Challenge 2: Build a simple Flask API with an endpoint that returns system health (CPU/memory usage).
🔹 Challenge 3: Create a Django app, set up models, views, and templates for a basic CRUD operation.
🔹 Challenge 4: Use Python subprocess to execute system commands and capture output.
🔹 Challenge 5: Build a Flask API that fetches live weather data from an external API and returns it in JSON format.
🔹 Challenge 6: Deploy a Django application on AWS EC2 with Nginx & Gunicorn.
🔹 Challenge 7: Write a Python program to parse log files and extract failed SSH login attempts.
🔹 Challenge 8: Use fabric or paramiko to automate SSH login and run commands on multiple servers.
🔹 Challenge 9: Implement a Python script that monitors Docker containers and sends alerts if a container crashes.
🔹 Challenge 10: Write a Python program that checks a GitHub repository for new commits and triggers a build job.
🔹 Challenge 11: Package your Python script as a CLI tool using argparse and click.
🔹 Challenge 12: Use any python binary package builder like PyInstaller, Nuitka, Cython, PyOxidizer etc, so that code will be heard to reverse engineer and become easily distributable
✅ Solutions:
✅ Challenge 1: Create a Python script that connects to a remote server via SSH using paramiko.
✅Answer:
✅ Step 1: Install Paramiko (If Not Installed)
pip install paramiko
✅ Step 2: Create the Python Script
📂 Path: Desktop/60DaysDevOps-Challenges/day6_python-advance/ssh_connect.py
import paramiko

def ssh_connect(hostname, username=None, password=None, key_path=None, command=None):
    """Connects to a remote server via SSH and executes a command."""

    try:
        # Create an SSH client
        client = paramiko.SSHClient()

        # Automatically accept unknown host keys (Not recommended for production)
        client.set_missing_host_key_policy(paramiko.AutoAddPolicy())

        print(f"🔌 Connecting to {hostname}...")

        if key_path:
            # Connect using SSH key
            client.connect(hostname, username=username, key_filename=key_path, timeout=10)
        else:
            # Connect using username and password
            client.connect(hostname, username=username, password=password, timeout=10)

        print(f"✅ Connected to {hostname}")

        # Execute the command
        stdin, stdout, stderr = client.exec_command(command)

        # Print command output
        print("📜 Command Output:")
        print(stdout.read().decode())

        # Print errors if any
        error = stderr.read().decode()
        if error:
            print(f"❌ Error:\n{error}")

        # Close the connection
        client.close()
        print("🔌 Disconnected.")

    except paramiko.AuthenticationException:
        print("❌ Authentication failed. Check your credentials.")
    except paramiko.SSHException as e:
        print(f"❌ SSH error: {e}")
    except Exception as e:
        print(f"❌ An error occurred: {e}")

# User input for authentication method
auth_method = input("Choose authentication method (1: Username & Password, 2: SSH Key): ")

hostname = input("Enter remote server IP or hostname: ")

if auth_method == "1":
    username = input("Enter SSH username: ")
    password = input("Enter SSH password: ")
    key_path = None
elif auth_method == "2":
    username = input("Enter SSH username: ")
    key_path = input("Enter path to SSH private key: ")
    password = None
else:
    print("❌ Invalid selection. Exiting.")
    exit()

command = input("Enter command to execute: ")

ssh_connect(hostname, username, password, key_path, command)
✅ Step 3: Run the Script
python Desktop/60DaysDevOps-Challenges/day6_python-advance/ssh_connect.py
📌 Example Input & Output:
Example 1: Using Username & Password Authentication
Input:
pgsqlCopyEditChoose authentication method (1: Username & Password, 2: SSH Key): 1
Enter remote server IP or hostname: 192.168.1.100
Enter SSH username: user
Enter SSH password: mysecurepassword
Enter command to execute: ls -l
Output:
sqlCopyEdit🔌 Connecting to 192.168.1.100...
✅ Connected to 192.168.1.100
📜 Command Output:
total 8
drwxr-xr-x 2 user user 4096 Mar  7 10:30 Documents
drwxr-xr-x 2 user user 4096 Mar  7 10:31 Downloads

🔌 Disconnected.
Example 2: Using SSH Key Authentication
Input:
pgsqlCopyEditChoose authentication method (1: Username & Password, 2: SSH Key): 2
Enter remote server IP or hostname: 192.168.1.100
Enter SSH username: user
Enter path to SSH private key: /home/user/.ssh/id_rsa
Enter command to execute: whoami
Output:
cssCopyEdit🔌 Connecting to 192.168.1.100...
✅ Connected to 192.168.1.100
📜 Command Output:
sandip

🔌 Disconnected.
🛠 Explanation of the Commands:
Import Paramiko - A Python library for SSH communication.
Create an SSH Client - Establishes an SSH connection to the server.
Authentication Methods:
Username & Password (
username+password)SSH Key Authentication (
username+key_path)
Executing a Remote Command - Uses
exec_command(command).Capturing Output & Errors - Reads the command output and prints errors.
Handling Exceptions - Catches errors like incorrect credentials, SSH failures, etc.
✅Challenge 2: Build a simple Flask API with an endpoint that returns system health (CPU/memory usage).
✅Answer:
✅ Step 1: Install Required Packages
pip install flask psutil
✅ Step 2: Create the Flask API
📂 Path: Desktop/60DaysDevOps-Challenges/day6_python-advance/app.py
from flask import Flask, jsonify
import psutil

app = Flask(__name__)

@app.route('/health', methods=['GET'])
def system_health():
    """Returns system health metrics (CPU & Memory usage)"""
    health_data = {
        "cpu_usage": psutil.cpu_percent(interval=1),
        "memory_usage": psutil.virtual_memory().percent
    }
    return jsonify(health_data)

if __name__ == '__main__':
    app.run(host='0.0.0.0', port=5000, debug=True)
✅ Step 3: Run the Flask API
python Desktop/60DaysDevOps-Challenges/day6_python-advance/app.py
🔹 Output:
* Running on http://127.0.0.1:5000/ (Press CTRL+C to quit)
✅ Step 4: Test the API
📌 Using Curl:
curl http://127.0.0.1:5000/health
📌 Using a Browser:
🔗 Open: http://127.0.0.1:5000/health
✅ Example JSON Response:
{
    "cpu_usage": 12.5,
    "memory_usage": 43.2
}
🚀 Bonus: Extended Health API with Disk and Network Stats
📂 Path: Desktop/60DaysDevOps-Challenges/day6_python-advance/app_extended.py
from flask import Flask, jsonify
import psutil

app = Flask(__name__)

@app.route('/health', methods=['GET'])
def system_health():
    """Returns system health metrics (CPU, Memory, Disk Usage, and Network Stats)"""
    disk_usage = psutil.disk_usage('/')
    net_io = psutil.net_io_counters()

    health_data = {
        "cpu_usage": psutil.cpu_percent(interval=1),
        "memory_usage": psutil.virtual_memory().percent,
        "disk_usage": {
            "total": disk_usage.total,
            "used": disk_usage.used,
            "free": disk_usage.free,
            "percent": disk_usage.percent
        },
        "network": {
            "bytes_sent": net_io.bytes_sent,
            "bytes_received": net_io.bytes_recv,
            "packets_sent": net_io.packets_sent,
            "packets_received": net_io.packets_recv
        }
    }
    return jsonify(health_data)

if __name__ == '__main__':
    app.run(host='0.0.0.0', port=5000, debug=True)
✅ Run Flask in the Background:
nohup python app_extended.py
🛠 Explanation of the Commands
flask- Used to create the API and define endpoints.psutil- Fetches system resource usage (CPU, Memory, Disk, Network).jsonify- Converts Python dictionary to JSON response.nohup- Runs the API in the background without stopping.
✅Challenge 3: Create a Django app, and set up models, views, and templates for a basic CRUD operation.
✅Answer:
✅ Step 1: Install Django
pip install django
✅ Step 2: Create a Django Project
django-admin startproject myproject
cd myproject
✅ Step 3: Create a Django App
python manage.py startapp myapp
Add myapp to INSTALLED_APPS in myproject/settings.py:
INSTALLED_APPS = [
    'django.contrib.admin',
    'django.contrib.auth',
    'django.contrib.contenttypes',
    'django.contrib.sessions',
    'django.contrib.messages',
    'django.contrib.staticfiles',
    'myapp',  # Add this line
]
✅ Step 4: Create a Model
📂 File: myapp/models.py
from django.db import models

class Task(models.Model):
    title = models.CharField(max_length=200)
    description = models.TextField()
    completed = models.BooleanField(default=False)

    def __str__(self):
        return self.title
✅ Step 5: Apply Migrations
python manage.py makemigrations
python manage.py migrate
✅ Step 6: Create a Form
📂 File: myapp/forms.py
from django import forms
from .models import Task

class TaskForm(forms.ModelForm):
    class Meta:
        model = Task
        fields = ['title', 'description', 'completed']
✅ Step 7: Create Views
📂 File: myapp/views.py
from django.shortcuts import render, redirect, get_object_or_404
from .models import Task
from .forms import TaskForm

# List all tasks
def task_list(request):
    tasks = Task.objects.all()
    return render(request, 'task_list.html', {'tasks': tasks})

# Create a new task
def task_create(request):
    if request.method == "POST":
        form = TaskForm(request.POST)
        if form.is_valid():
            form.save()
            return redirect('task_list')
    else:
        form = TaskForm()
    return render(request, 'task_form.html', {'form': form})

# Update an existing task
def task_update(request, pk):
    task = get_object_or_404(Task, pk=pk)
    if request.method == "POST":
        form = TaskForm(request.POST, instance=task)
        if form.is_valid():
            form.save()
            return redirect('task_list')
    else:
        form = TaskForm(instance=task)
    return render(request, 'task_form.html', {'form': form})

# Delete a task
def task_delete(request, pk):
    task = get_object_or_404(Task, pk=pk)
    if request.method == "POST":
        task.delete()
        return redirect('task_list')
    return render(request, 'task_confirm_delete.html', {'task': task})
✅ Step 8: Create Templates
📂 Directory: myapp/templates/
📄 Task List (task_list.html)
<!DOCTYPE html>
<html>
<head><title>Task List</title></head>
<body>
    <h1>Task List</h1>
    <a href="{% url 'task_create' %}">Add Task</a>
    <ul>
        {% for task in tasks %}
            <li>
                {{ task.title }} - {{ task.description }}
                <a href="{% url 'task_update' task.id %}">Edit</a> |
                <a href="{% url 'task_delete' task.id %}">Delete</a>
            </li>
        {% endfor %}
    </ul>
</body>
</html>
📄 Task Form (task_form.html)
<!DOCTYPE html>
<html>
<head><title>Task Form</title></head>
<body>
    <h1>{% if form.instance.pk %}Edit Task{% else %}New Task{% endif %}</h1>
    <form method="post">
        {% csrf_token %}
        {{ form.as_p }}
        <button type="submit">Save</button>
    </form>
    <a href="{% url 'task_list' %}">Back to list</a>
</body>
</html>
📄 Task Delete (task_confirm_delete.html)
<!DOCTYPE html>
<html>
<head><title>Delete Task</title></head>
<body>
    <h1>Are you sure you want to delete "{{ task.title }}"?</h1>
    <form method="post">
        {% csrf_token %}
        <button type="submit">Yes, Delete</button>
    </form>
    <a href="{% url 'task_list' %}">Cancel</a>
</body>
</html>
✅ Step 9: Configure URLs
📂 File: myapp/urls.py
from django.urls import path
from .views import task_list, task_create, task_update, task_delete

urlpatterns = [
    path('', task_list, name='task_list'),
    path('create/', task_create, name='task_create'),
    path('update/<int:pk>/', task_update, name='task_update'),
    path('delete/<int:pk>/', task_delete, name='task_delete'),
]
📂 Modify: myproject/urls.py
from django.contrib import admin
from django.urls import path, include

urlpatterns = [
    path('admin/', admin.site.urls),
    path('', include('myapp.urls')),
]
✅ Step 10: Run the Django Server
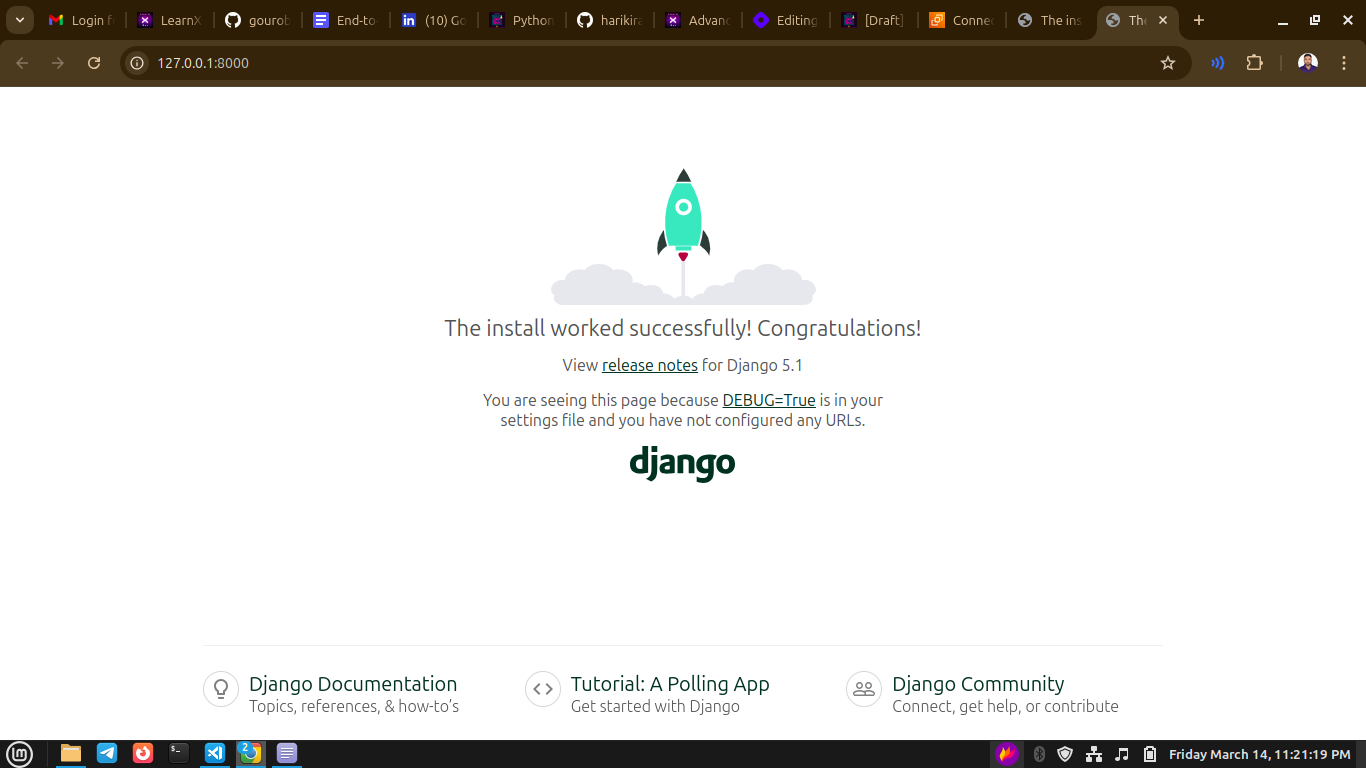
python manage.py runserver
🔗 Open in Browser: http://127.0.0.1:8000/
🛠 Explanation of the Commands
django-admin startproject myproject→ Creates a new Django project.python manage.py startapp myapp→ Creates an app within the project.python manage.py makemigrations→ Prepares database changes.python manage.py migrate→ Applies database migrations.python manage.py runserver→ Starts the development server.
✅Challenge 4: Use Python subprocess to execute system commands and capture output.
✅Answer:
✅ Step 1: Create the Python Script
📂 File: run_command.py
import subprocess

def run_command(command):
    """Executes a system command and captures its output."""
    try:
        result = subprocess.run(command, shell=True, check=True, text=True, capture_output=True)
        print("✅ Command executed successfully!\n")
        print("📜 Output:\n", result.stdout)
    except subprocess.CalledProcessError as e:
        print(f"❌ Command failed with error:\n{e.stderr}")

# Get user input for a command
command = input("📝 Enter a system command to run: ")
run_command(command)
✅ Step 2: Run the Script
python challenge4-run_command.py
✅ Step 3: Test with Example Commands
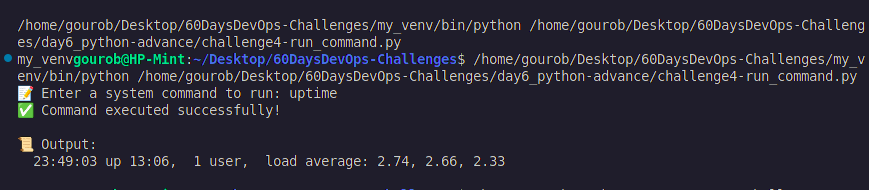
🟢 Example 1: Check System Uptime
📝 Enter a system command to run: uptime
📜 Output:
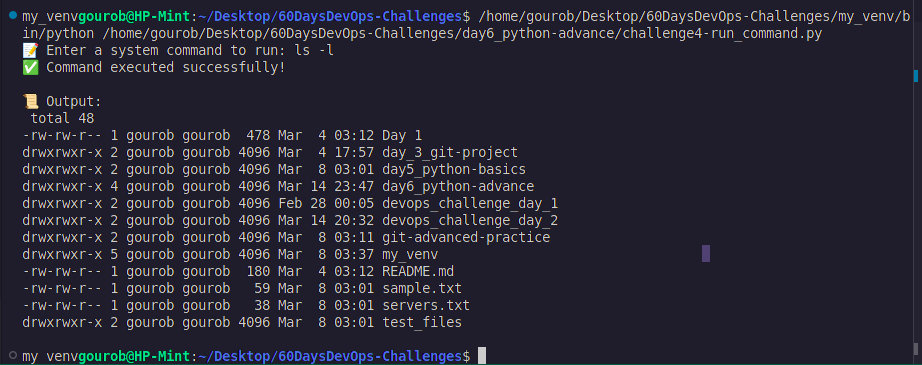
🟢 Example 2: List Files
📝 Enter a system command to run: ls -l
📜 Output:
🔴 Example 3: Run an Invalid Command
📝 Enter a system command to run: invalidcommand
❌ Output:

🛠 Explanation of the Commands
subprocess.run(command, shell=True, check=True, text=True, capture_output=True)
→ Runs the command, captures output, and raises an error if the command fails.input("Enter a system command to run: ")
→ Takes user input for a system command.try-exceptblock
→ Handles errors when a command fails.
✅Challenge 5: Build a Flask API that fetches live weather data from an external API and returns it in JSON format.
✅Answer:
✅ Step 1: Sign Up for an API Key
🔗 Go to: OpenWeatherMap Signup
📌 Steps:
Sign up for a free account.
Navigate to the API Keys page.
Copy your free API key.
✅ Step 2: Install Required Packages
pip install flask requests
✅ Step 3: Create the Flask API
📂 File: weather_api.py
from flask import Flask, jsonify, request
import requests

app = Flask(__name__)

# 🌍 Replace with your OpenWeatherMap API key
API_KEY = "your_api_key_here"
BASE_URL = "http://api.openweathermap.org/data/2.5/weather"

@app.route('/weather', methods=['GET'])
def get_weather():
    """🌤️ Fetch live weather data for a given city."""
    city = request.args.get('city')

    if not city:
        return jsonify({"error": "❌ City parameter is required"}), 400

    params = {"q": city, "appid": API_KEY, "units": "metric"}

    try:
        response = requests.get(BASE_URL, params=params)
        data = response.json()

        if response.status_code != 200:
            return jsonify({"error": data.get("message", "Unknown error")}), response.status_code

        weather_data = {
            "🌆 City": data["name"],
            "🌡️ Temperature (°C)": data["main"]["temp"],
            "🌦️ Weather": data["weather"][0]["description"],
            "💧 Humidity (%)": data["main"]["humidity"],
            "🌬️ Wind Speed (m/s)": data["wind"]["speed"]
        }
        return jsonify(weather_data)

    except requests.exceptions.RequestException as e:
        return jsonify({"error": f"API request failed: {e}"}), 500

if __name__ == '__main__':
    app.run(host='0.0.0.0', port=5000, debug=True)
✅ Step 4: Run the Flask API
python challenge5-weather_api.py
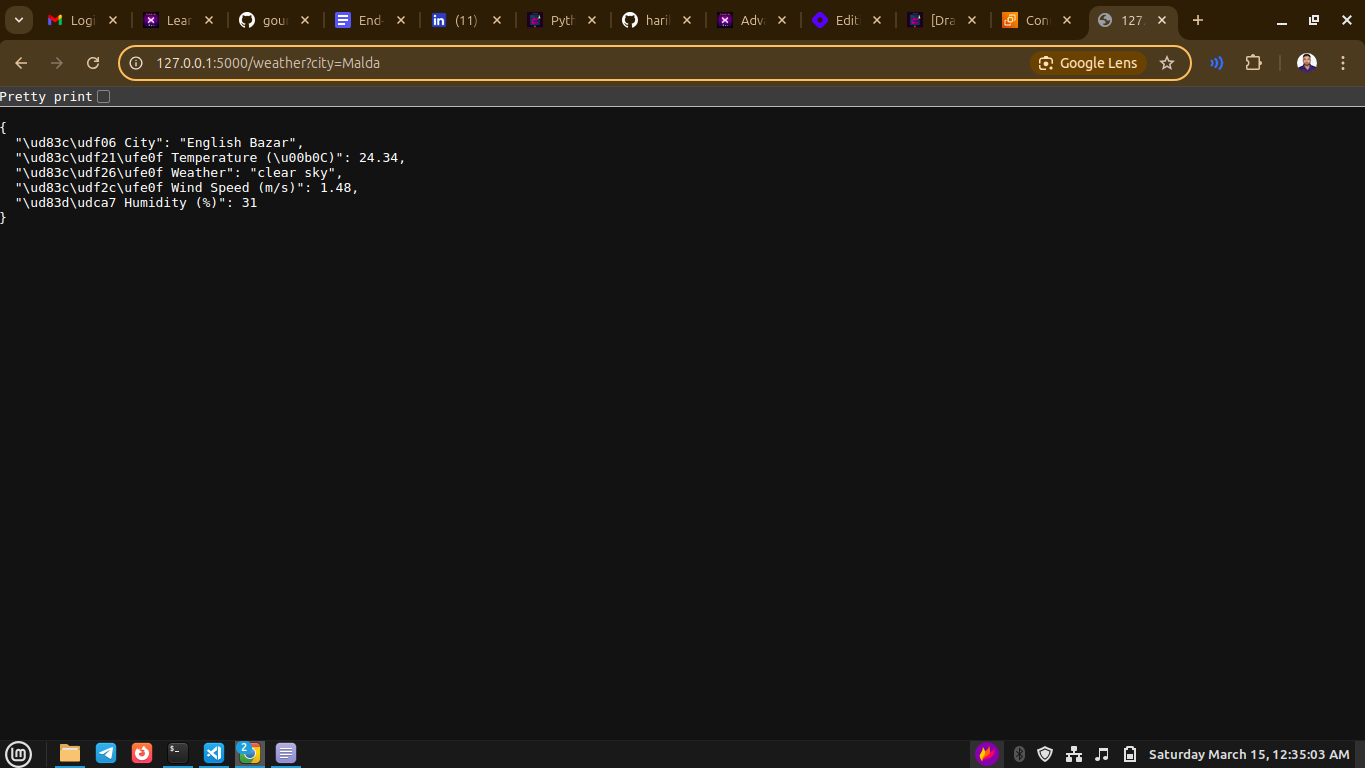
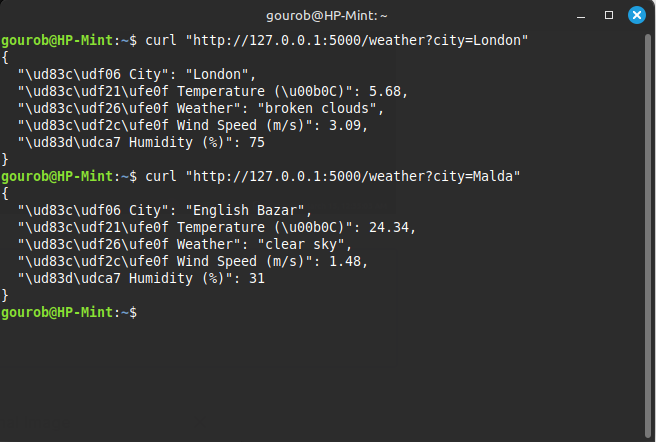
✅ Step 5: Test the API
🔹 Using Curl:
curl "http://127.0.0.1:5000/weather?city=Malda"
🔹 Using a Browser:
🌍 Open: http://127.0.0.1:5000/weather?city=Malda
🛠 Explanation of the Commands
pip install flask requests
→ Installs Flask for API development and Requests for making HTTP calls.request.args.get('city')
→ Retrieves thecityparameter from the API request.requests.get(BASE_URL, params=params)
→ Calls the OpenWeatherMap API with the city and API key.jsonify(weather_data)
→ Converts the weather response into JSON format.app.run(host='0.0.0.0', port=5000, debug=True)
→ Starts the Flask API server on port 5000.
✅Challenge 6: Deploy a Django application on AWS EC2 with Nginx & Gunicorn.
✅Answer:
✅ Step 1: Launch an AWS EC2 Instance
Log in to AWS and navigate to EC2 Dashboard.
Click Launch Instance and configure:
OS: Ubuntu 22.04 LTS
Instance type:
t2.micro(Free Tier)Security Group:
- Allow SSH (22), HTTP (80), HTTPS (443)
Launch the instance and connect via SSH:
ssh -i your-key.pem ubuntu@your-ec2-public-ip
✅ Step 2: Install Required Packages
Update the system:
sudo apt update && sudo apt upgrade -y
Install dependencies:
sudo apt install python3-pip python3-venv nginx git -y
✅ Step 3: Clone Your Django Project
cd /home/ubuntu
git clone https://github.com/your-username/60DaysDevOps-Challenges.git
cd 60DaysDevOps-Challenges/day6_python-advance/myproject
✅ Step 4: Set Up a Virtual Environment & Install Dependencies
python3 -m venv my_venv
source my_venv/bin/activate
pip install -r requirements.txt
if requirements.txt is not available, create it
nano requirements.txt
paste this code then ctrl+x, then y then enter key
📄 requirements.txt
Django>=4.2,<5.0
gunicorn>=21.0.0
psycopg2>=2.9.3  # If using PostgreSQL
mysqlclient>=2.1.0  # If using MySQL
whitenoise>=6.5.0  # For static file serving
djangorestframework>=3.14.0  # If using DRF
django-environ>=0.10.0  # For environment variables
command for install dependencies
pip install psycopg2

pip install psycopg2-binary

sudo apt update && sudo apt install -y libpq-dev python3-dev

sudo apt update && sudo apt install -y pkg-config libmysqlclient-dev

ip install -r requirements.txt
✅ Step 5: Configure Django Settings
Modify settings.py:
ALLOWED_HOSTS = ["your-ec2-public-ip", "your-domain.com"]
Open your Django settings file:
nano myproject/settings.py
example:

Add this at the bottom:
pythonCopy codeimport os

STATIC_ROOT = os.path.join(BASE_DIR, "staticfiles")
STATIC_URL = "/static/"
🔹
STATIC_ROOTis the directory wherecollectstaticwill put all static files.
🔹STATIC_URLdefines how static files will be accessed.
Create the static directory manually (optional but recommended):
mkdir ~/60DaysDevOps-Challenges/day6_python-advance/myproject/staticfiles
Collect static files:
python manage.py collectstatic
Run migrations:
python manage.py migrate
✅ Step 6: Set Up Gunicorn
Install Gunicorn:
pip install gunicorn
Start Gunicorn Server:
gunicorn --workers 3 --bind 0.0.0.0:8000 myproject.wsgi:application
✅ Step 7: Set Up Nginx as a Reverse Proxy
Create an Nginx configuration file:
sudo nano /etc/nginx/sites-available/django
Paste the following configuration:
server {
    listen 80;
    server_name your-ec2-public-ip;

    location / {
        proxy_pass http://127.0.0.1:8000;
        proxy_set_header Host $host;
        proxy_set_header X-Real-IP $remote_addr;
        proxy_set_header X-Forwarded-For $proxy_add_x_forwarded_for;
    }
}
Enable the configuration:
sudo ln -s /etc/nginx/sites-available/django /etc/nginx/sites-enabled
sudo nginx -t  # Test configuration
sudo systemctl restart nginx
✅ Step 8: Run Django as a Background Process
Create a Gunicorn systemd service:
sudo nano /etc/systemd/system/gunicorn.service
Paste the following:
[Unit]
Description=Gunicorn service for Django
After=network.target

[Service]
User=ubuntu
Group=ubuntu
WorkingDirectory=/home/ubuntu/django-app
ExecStart=/home/ubuntu/django-app/venv/bin/gunicorn --workers 3 --bind unix:/home/ubuntu/django-app/gunicorn.sock myproject.wsgi:application

[Install]
WantedBy=multi-user.target
Enable and start the service:
sudo systemctl daemon-reload
sudo systemctl start gunicorn
sudo systemctl enable gunicorn
✅ Step 9: Configure Firewall & Security Groups
Allow Nginx through the firewall:
sudo ufw allow 'Nginx Full'
sudo ufw enable
Ensure AWS Security Group allows inbound traffic on ports 80 & 443.
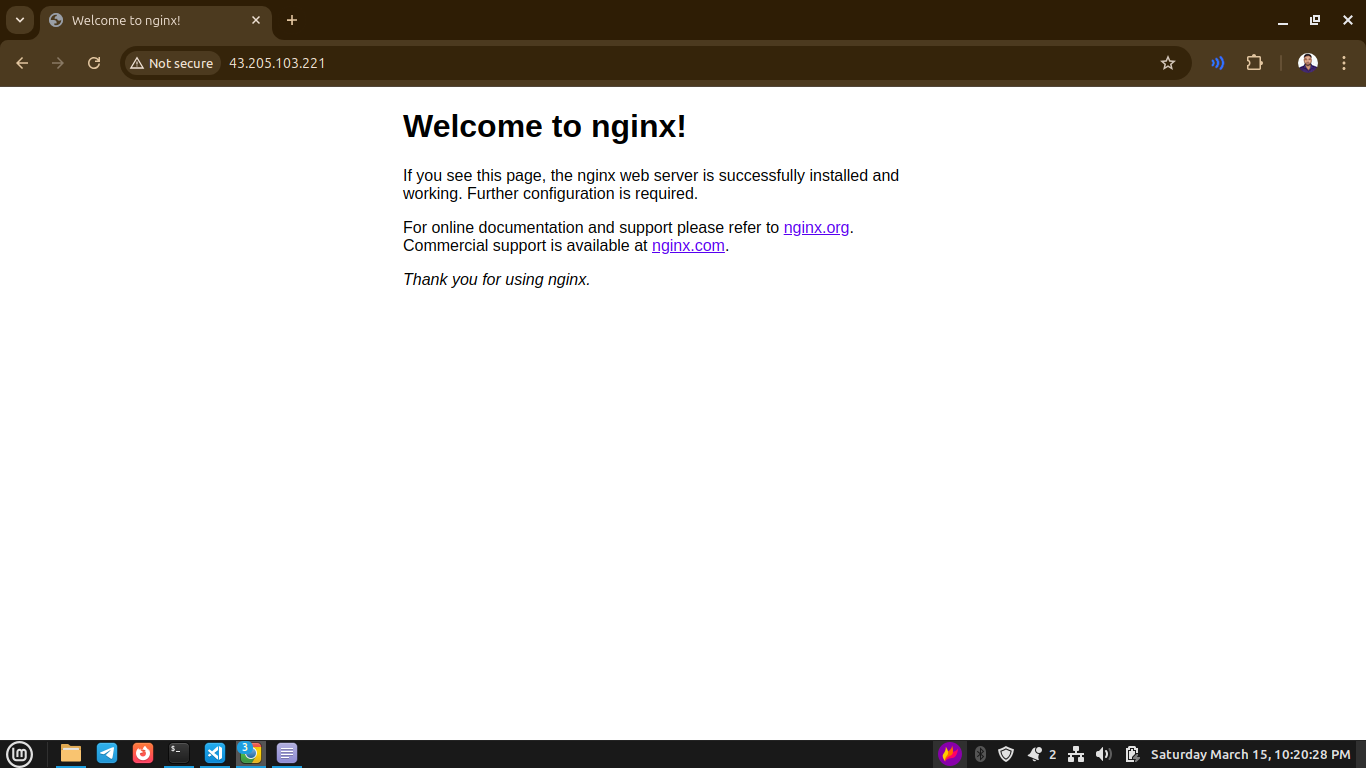
✅ Step 10: Access the Application
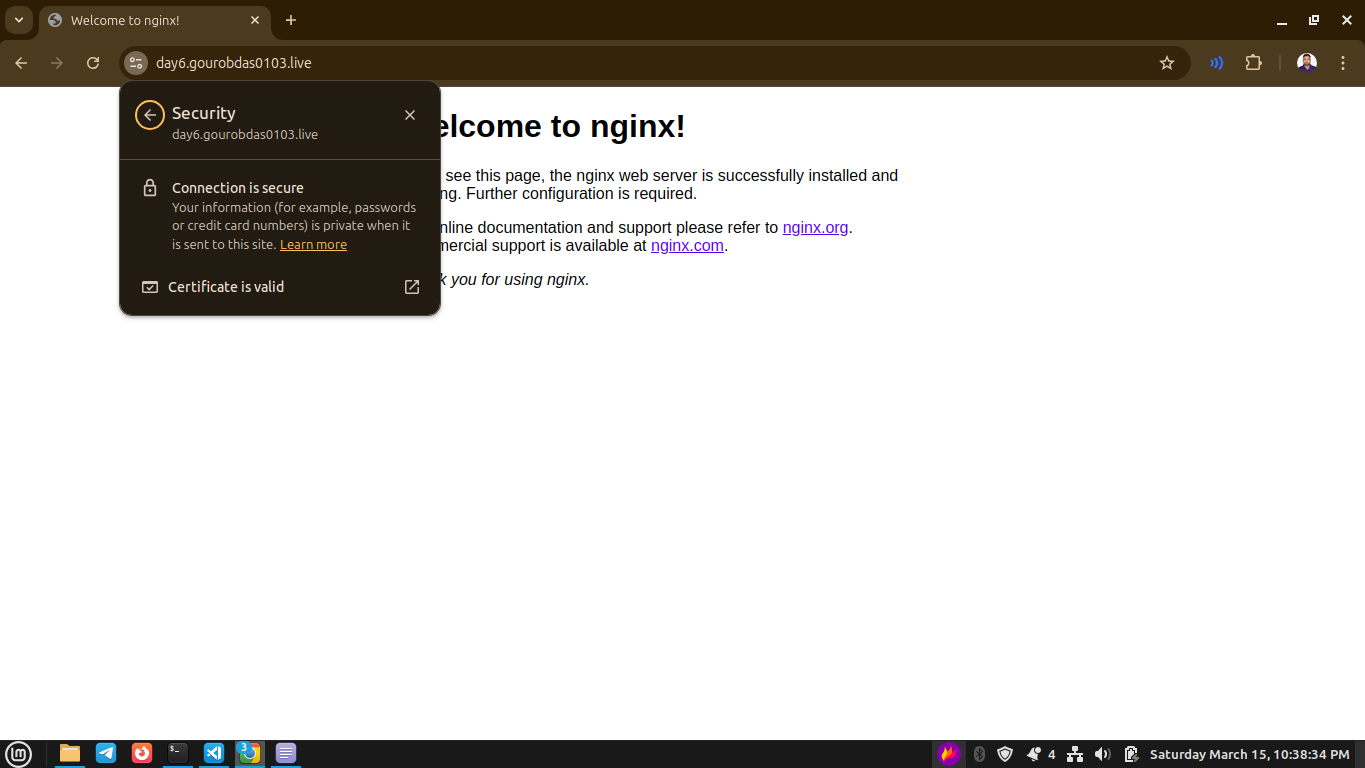
🌐 Open http://your-ec2-public-ip or yourdomain.com in a browser.
example:
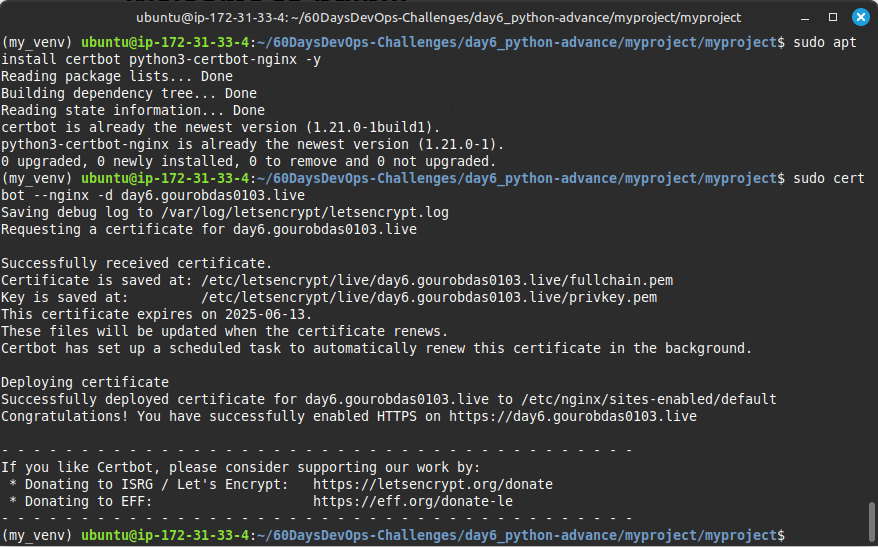
✅ Bonus: Enable HTTPS with Let's Encrypt
sudo apt install certbot python3-certbot-nginx -y
sudo certbot --nginx -d your-domain.com
🔒 This enables SSL/TLS for secure connections.
example:
🛠 Explanation of the Commands
🔹 python3 -m venv venv && source venv/bin/activate → Creates & activates a virtual environment.
🔹 pip install -r requirements.txt → Installs required Python dependencies.
🔹 gunicorn --workers 3 --bind 0.0.0.0:8000 myproject.wsgi:application → Runs Django using Gunicorn on port 8000.
🔹 sudo ln -s /etc/nginx/sites-available/django /etc/nginx/sites-enabled → Enables the Nginx configuration.
🔹 sudo certbot --nginx -d your-domain.com → Sets up HTTPS using Let's Encrypt.
✅Challenge 7: Write a Python program to parse log files and extract failed SSH login attempts.
Step 1: Create the Python Script (parse_ssh_logs.py)
import re

LOG_FILE = "/var/log/auth.log"  # Modify if using a different log file

def parse_ssh_failures(log_file):
    """Parses the log file and extracts failed SSH login attempts."""

    try:
        with open(log_file, "r") as file:
            logs = file.readlines()

        failed_attempts = []

        # Regular expression to match failed SSH login attempts
        ssh_fail_pattern = re.compile(r"Failed password for (invalid user )?(\S+) from (\d+\.\d+\.\d+\.\d+) port \d+")

        for line in logs:
            match = ssh_fail_pattern.search(line)
            if match:
                user = match.group(2)
                ip_address = match.group(3)
                failed_attempts.append((user, ip_address))

        # Print extracted failed login attempts
        print("📜 Failed SSH Login Attempts:")
        for user, ip in failed_attempts:
            print(f"🔴 User: {user} | IP: {ip}")

    except FileNotFoundError:
        print(f"❌ Error: Log file '{log_file}' not found!")
    except Exception as e:
        print(f"❌ An error occurred: {e}")

# Run the log parsing function
parse_ssh_failures(LOG_FILE)
Step 2: Run the Script
sudo python parse_ssh_logs.py
sudo is required to read system logs (/var/log/auth.log).
Example Output
📜 Failed SSH Login Attempts:

🔴 User: admin | IP: 192.168.1.100

🔴 User: root | IP: 203.0.113.50

🔴 User: test | IP: 178.62.80.100
🛠 Explanation of the Commands:
🔹 re.compile(r"Failed password for (invalid user )?(?P<user>\S+) from (?P<ip>\S+) port")
- Uses regex to capture failed SSH login attempts, extracting the username and IP.
🔹 open(log_path, "r")
- Opens the log file in read mode.
🔹 match = pattern.search(line)
- Checks each line for failed login patterns.
🔹 failed_attempts.append((user, ip))
- Stores extracted usernames and IPs in a list.
🔹 Exception Handling (FileNotFoundError)
- Prevents errors if the log file doesn’t exist.
✅ Challenge 8: Use fabric or paramiko to automate SSH login and run commands on multiple servers.
Option 1: Using Fabric
Fabric simplifies SSH automation with an easy-to-use API.
Step 1: Install Fabric
pip install fabric
Step 2: Create the Python Script (challenge8_paramiko_ssh.py)
from fabric import Connection

# List of servers to connect to
servers = [
    {"host": "192.168.1.100", "user": "ubuntu", "password": "yourpassword", "ssh_key": "/path/to/your/private_key"},
    {"host": "192.168.1.101", "user": "ubuntu", "password": "yourpassword", "ssh_key": None},  # No SSH key, use password
]

def run_command_on_servers(command):
    """Runs a command on multiple servers using Fabric."""
    for server in servers:
        try:
            print(f"🔌 Connecting to {server['host']}...")

            connect_kwargs = {}
            if server.get("ssh_key"):
                connect_kwargs["key_filename"] = server["ssh_key"]
            elif server.get("password"):
                connect_kwargs["password"] = server["password"]

            conn = Connection(host=server["host"], user=server["user"], connect_kwargs=connect_kwargs)
            result = conn.run(command, hide=True)
            print(f"✅ {server['host']} Output:\n{result.stdout.strip()}\n")

        except Exception as e:
            print(f"❌ Failed to connect to {server['host']}: {e}")

# Run a command on all servers
run_command_on_servers("uptime")
Step 3: Run the Script
python challenge8_paramiko_ssh.py
Example Output:
🔌 Connecting to 192.168.1.100...
✅ 192.168.1.100 Output:
10:42:30 up 5 days,  2:30,  2 users,  load average: 0.15, 0.12, 0.10

🔌 Connecting to 192.168.1.101...
✅ 192.168.1.101 Output:
10:42:35 up 7 days,  1:15,  3 users,  load average: 0.20, 0.18, 0.12
Option 2: Using Paramiko
If you prefer low-level SSH automation, use Paramiko.
Step 1: Install Paramiko
pip install paramiko
Step 2: Create the Python Script (paramiko_ssh.py)
import paramiko

# List of servers
servers = [
    {"host": "192.168.1.100", "user": "ubuntu", "password": None, "key": "/path/to/private/key"},
    {"host": "192.168.1.101", "user": "ubuntu", "password": "yourpassword", "key": None},
]

def run_ssh_command(host, user, password, key, command):
    """Runs an SSH command using Paramiko with support for both key and password authentication."""
    try:
        client = paramiko.SSHClient()
        client.set_missing_host_key_policy(paramiko.AutoAddPolicy())

        if key:
            client.connect(hostname=host, username=user, key_filename=key, timeout=10)
        else:
            client.connect(hostname=host, username=user, password=password, timeout=10)

        stdin, stdout, stderr = client.exec_command(command)
        output = stdout.read().decode().strip()
        error = stderr.read().decode().strip()

        print(f"✅ {host} Output:\n{output}\n" if output else f"❌ {host} Error:\n{error}\n")
        client.close()
    except Exception as e:
        print(f"❌ Failed to connect to {host}: {e}")

# Run command on all servers
for server in servers:
    print(f"🔌 Connecting to {server['host']}...")
    run_ssh_command(server["host"], server["user"], server.get("password"), server.get("key"), "uptime")
Step 3: Run the Script
python paramiko_ssh.py
Example Output
🔌 Connecting to 192.168.1.100...

✅ 192.168.1.100 Output:

10:42:30 up 5 days,  2:30,  2 users,  load average: 0.15, 0.12, 0.10


🔌 Connecting to 192.168.1.101...

✅ 192.168.1.101 Output:

10:42:35 up 7 days,  1:15,  3 users,  load average: 0.20, 0.18, 0.12
✅ Challenge 9: Implement a Python script that monitors Docker containers and sends alerts if a container crashes
📌 Steps to Implement
1️⃣ Install Dependencies
Ensure you have Python’s Docker SDK installed:
pip install docker requests
Also, make sure the Docker daemon is running:
sudo systemctl start docker
2️⃣ Python Script (challenge9_monitor_docker.py)
This script monitors Docker containers and sends alerts via Email and Slack if a container stops unexpectedly.
import docker
import time
import smtplib
import requests
from email.mime.text import MIMEText

# Initialize Docker client
client = docker.from_env()

# Email alert configuration
SMTP_SERVER = "smtp.gmail.com"  # Replace with your SMTP server
SMTP_PORT = 587
EMAIL_FROM = "your-email@gmail.com"
EMAIL_TO = "alert-recipient@gmail.com"
EMAIL_PASSWORD = "your-email-password"

# Slack alert configuration
SLACK_WEBHOOK_URL = "https://hooks.slack.com/services/your/webhook/url"  # Replace with your Slack webhook

def send_email_alert(container_name):
    """Sends an email alert when a container crashes."""
    subject = f"🚨 ALERT: Docker Container {container_name} Stopped!"
    body = f"The container '{container_name}' has stopped unexpectedly."

    msg = MIMEText(body)
    msg["Subject"] = subject
    msg["From"] = EMAIL_FROM
    msg["To"] = EMAIL_TO

    try:
        server = smtplib.SMTP(SMTP_SERVER, SMTP_PORT)
        server.starttls()
        server.login(EMAIL_FROM, EMAIL_PASSWORD)
        server.sendmail(EMAIL_FROM, EMAIL_TO, msg.as_string())
        server.quit()
        print(f"📧 Email alert sent for {container_name}")
    except Exception as e:
        print(f"❌ Failed to send email: {e}")

def send_slack_alert(container_name):
    """Sends a Slack alert when a container crashes."""
    message = {
        "text": f"🚨 *ALERT:* Docker Container `{container_name}` has stopped unexpectedly!"
    }

    try:
        response = requests.post(SLACK_WEBHOOK_URL, json=message)
        if response.status_code == 200:
            print(f"💬 Slack alert sent for {container_name}")
        else:
            print(f"❌ Failed to send Slack alert: {response.text}")
    except Exception as e:
        print(f"❌ Slack request failed: {e}")

def monitor_containers():
    """Monitors Docker containers and alerts if any crash."""
    print("🔍 Monitoring Docker containers...")
    known_containers = {container.name: container.status for container in client.containers.list(all=True)}

    while True:
        for container in client.containers.list(all=True):
            if container.name in known_containers and container.status != "running":
                print(f"⚠️ {container.name} has stopped!")
                send_email_alert(container.name)
                send_slack_alert(container.name)
                known_containers[container.name] = container.status

        time.sleep(10)  # Check every 10 seconds

# Start monitoring
monitor_containers()
3️⃣ Run the Script
Execute the monitoring script:
python monitor_docker.py
4️⃣ Simulate a Container Crash
Start a test container:
docker run -d --name test_container alpine sleep 100
Manually stop the container to trigger an alert:
docker stop test_container
✅ Example Output
🔍 Monitoring Docker containers...

⚠️ test_container has stopped!

📧 Email alert sent for test_container
💬 Slack alert sent for test_container
🛠 Explanation of the Commands
| Command | Explanation |
pip install docker requests | Installs required Python libraries. |
sudo systemctl start docker | Starts the Docker daemon. |
docker run -d --name test_container alpine sleep 100 | Runs a test container that sleeps for 100 seconds. |
docker stop test_container | Manually stops the container to simulate a crash. |
🚀 Bonus: Run as a Background Process
To run the monitoring script continuously in the background:
nohup python monitor_docker.py &
✅ Challenge 10: Write a Python program that checks a GitHub repository for new commits and triggers a build job.
Answer:
📌 Steps to Implement
1️⃣ Install Dependencies
Ensure the required Python library is installed:
pip install requests
2️⃣ Python Script (challenge10_check_github_commits.py)
This script checks a GitHub repository for new commits and triggers a CI/CD build job when a new commit is detected.
import requests
import time
import json

# GitHub repository details
GITHUB_REPO = "owner/repository"  # Replace with your GitHub repo (e.g., "torvalds/linux")
GITHUB_BRANCH = "main"
GITHUB_API_URL = f"https://api.github.com/repos/{GITHUB_REPO}/commits/{GITHUB_BRANCH}"
LAST_COMMIT_FILE = "last_commit.json"

# CI/CD build trigger URL (e.g., Jenkins, GitHub Actions, etc.)
BUILD_TRIGGER_URL = "https://ci.example.com/build"  # Replace with your CI/CD webhook URL

def get_latest_commit():
    """Fetches the latest commit SHA from GitHub API."""
    try:
        response = requests.get(GITHUB_API_URL)
        response.raise_for_status()
        commit_data = response.json()
        return commit_data["sha"]
    except requests.exceptions.RequestException as e:
        print(f"❌ Error fetching latest commit: {e}")
        return None

def load_last_commit():
    """Loads the last stored commit SHA from a local file."""
    try:
        with open(LAST_COMMIT_FILE, "r") as file:
            return json.load(file).get("last_commit")
    except FileNotFoundError:
        return None

def save_last_commit(commit_sha):
    """Saves the latest commit SHA to a local file."""
    with open(LAST_COMMIT_FILE, "w") as file:
        json.dump({"last_commit": commit_sha}, file)

def trigger_build(commit_sha):
    """Triggers a CI/CD build job when a new commit is detected."""
    try:
        response = requests.post(BUILD_TRIGGER_URL, json={"commit": commit_sha})
        if response.status_code == 200:
            print(f"✅ Build triggered successfully for commit: {commit_sha}")
        else:
            print(f"⚠️ Failed to trigger build. Status Code: {response.status_code}")
    except requests.exceptions.RequestException as e:
        print(f"❌ Error triggering build: {e}")

def monitor_github():
    """Monitors the GitHub repository for new commits."""
    print(f"🔍 Monitoring GitHub repository: {GITHUB_REPO}")

    while True:
        latest_commit = get_latest_commit()
        if not latest_commit:
            time.sleep(60)
            continue

        last_commit = load_last_commit()

        if latest_commit != last_commit:
            print(f"🚀 New commit detected: {latest_commit}")
            trigger_build(latest_commit)
            save_last_commit(latest_commit)
        else:
            print("✅ No new commits detected.")

        time.sleep(60)  # Check every 60 seconds

# Start monitoring
monitor_github()
3️⃣ Run the Script
Execute the monitoring script:
python challenge10_check_github_commits.py
4️⃣ Example Output
🔍 Monitoring GitHub repository: owner/repository

✅ No new commits detected.

🚀 New commit detected: 1a2b3c4d5e

✅ Build triggered successfully for commit: 1a2b3c4d5e

✅ No new commits detected.
🛠 Explanation of the Commands
| Command | Explanation |
pip install requests | Installs the requests library for making API calls. |
python check_github_commits.py | Runs the script to monitor GitHub commits. |
requests.get(GITHUB_API_URL) | Fetches the latest commit from GitHub API. |
requests.post(BUILD_TRIGGER_URL, json={"commit": commit_sha}) | Triggers the CI/CD build for the new commit. |
🚀 Bonus: Run as a Background Process
To keep the monitoring script running in the background:
nohup python check_github_commits.py &
✅ Challenge 11: Package your Python script as a CLI tool using argparse and click.
Answer:
Option 1: Using argparse
Step 1: Create the Python Script (cli_tool.py)
import argparse

def greet(name, uppercase):
    """Prints a greeting message."""
    message = f"Hello, {name}!"
    if uppercase:
        message = message.upper()
    print(message)

def main():
    parser = argparse.ArgumentParser(description="Simple CLI tool to greet users.")

    parser.add_argument("name", type=str, help="Name of the person to greet")
    parser.add_argument("-u", "--uppercase", action="store_true", help="Convert the greeting to uppercase")

    args = parser.parse_args()
    greet(args.name, args.uppercase)

if __name__ == "__main__":
    main()
Step 2: Run the CLI Tool
python cli_tool.py Gourob
Output:
Hello, Sandip!
Run with the -u flag:
python cli_tool.py Gourob -u
Output:
HELLO, GOUROB!
Option 2: Using click
click provides a more elegant and user-friendly CLI experience.
Step 1: Install click
pip install click
Step 2: Create the Python Script (challenge11_cli_tool.py)
import click

@click.command()
@click.argument("name")
@click.option("--uppercase", is_flag=True, help="Convert the greeting to uppercase")
def greet(name, uppercase):
    """Simple CLI tool to greet users."""
    message = f"Hello, {name}!"
    if uppercase:
        message = message.upper()
    click.echo(message)

if __name__ == "__main__":
    greet()
Step 3: Run the CLI Tool
python challenge11_cli_tool.py Gourob
Output:
Hello, Gourob!
Run with the --uppercase flag:
python challenge11_cli_tool Gourob --uppercase
Output:
HELLO, GOUROB!
Bonus 💡 Make it a Global CLI Command
Step 1: Create a setup.py for Packaging
Create a setup.py file to install the CLI tool globally:
from setuptools import setup

setup(
    name="greet-cli",
    version="1.0",
    py_modules=["cli_tool_click"],  # Update for argparse version if needed
    install_requires=["click"],
    entry_points={
        "console_scripts": [
            "greet=cli_tool_click:greet",
        ],
    },
)
Step 2: Install the CLI Tool
pip install --editable .
Step 3: Run the CLI Tool Globally
greet Gourob --uppercase
Output:
HELLO, Gourob!
✅ Challenge 12: Use any python binary package builder like PyInstaller, Nuitka, Cython, PyOxidizer etc, so that code will be heard to reverse engineer and become easily distributable
📌 Option 1: Using PyInstaller (Easy & Popular)
PyInstaller converts Python scripts into standalone executables.
1️⃣ Install PyInstaller
pip install pyinstaller
2️⃣ Convert the Script into an Executable
pyinstaller --onefile --noconsole cli_tool.py
--onefile→ Bundles everything into a single executable.--noconsole→ Hides the console window (for GUI apps).
3️⃣ Run the Executable
Windows:
dist\cli_tool.exeLinux/macOS:
./dist/cli_tool
4️⃣ Make It Harder to Reverse-Engineer
Add encryption using a secret key:
pyinstaller --onefile --noconsole --key "your-secret-key" cli_tool.py
📌 Option 2: Using Nuitka (Compiles to C for Better Obfuscation)
Nuitka converts Python scripts into C, making them faster and harder to decompile.
1️⃣ Install Nuitka
pip install nuitka
2️⃣ Compile the Script
nuitka --standalone --onefile --follow-imports cli_tool.py
3️⃣ Run the Executable
Windows:
cli_tool.exeLinux/macOS:
./cli_tool.bin
📌 Option 3: Using Cython (Converts Python to Compiled C)
Cython compiles Python into C-based executables, making it efficient and obfuscated.
1️⃣ Install Cython
pip install cython
2️⃣ Convert Script to a C Extension
python --embed -o cli_tool.c cli_tool.py
3️⃣ Compile to an Executable
gcc -o cli_tool cli_tool.c $(python3-config --cflags --ldflags)
4️⃣ Run the Executable
./cli_tool
📌 Option 4: Using PyOxidizer (Best for Performance & Security)
PyOxidizer packages Python apps into a fast, single-file binary.
1️⃣ Install PyOxidizer
pip install pyoxidizer
2️⃣ Generate a Config File
pyoxidizer init-config
3️⃣ Modify pyoxidizer.bzl
Edit the file and add:
def make_oxidized_python_distribution(pyoxidizer):
    dist = pyoxidizer.default_python_distribution()
    policy = pyoxidizer.default_resource_policy()

    # Define the executable
    exe = pyoxidizer.add_python_executable(
        name="cli_tool",
        python_distribution=dist,
        policy=policy,
    )

    # Add your script
    exe.add_python_resources(exe.pip_install(["cli_tool.py"]))

    # Enable single binary mode
    exe.packaging_mode = "standalone_exe"

    # Set entry point
    exe.set_entry_point("cli_tool", "main")

    return exe
4️⃣ Build the Executable
pyoxidizer build
5️⃣ Run the Executable
./cli_tool
🛠 Explanation of the Commands
| Command | Explanation |
pip install pyinstaller | Installs PyInstaller. |
pyinstaller --onefile --noconsole cli_tool.py | Creates a standalone executable. |
pip install nuitka | Installs Nuitka for C-based compilation. |
nuitka --standalone --onefile cli_tool.py | Compiles Python to C for better security. |
pip install cython | Installs Cython to convert Python to C. |
cython --embed -o cli_tool.c cli_tool.py | Converts Python to a C file. |
gcc -o cli_tool cli_tool.c $(python3-config --cflags --ldflags) | Compiles the C file into an executable. |
pip install pyoxidizer | Installs PyOxidizer for a more optimized binary. |
pyoxidizer build | Builds the Python script into an optimized standalone executable. |


